Showing posts with label software engineering. Show all posts

Wednesday, August 24, 2011

Using Sapphire to Work with Java Types

This article covers an intermediate topic related to Sapphire. Those unfamiliar with Sapphire should first read the introduction.

When implementing Eclipse tooling that works with Java projects, a frequent requirement is to deliver models and UI that reference Java types (classes, interfaces, enumerations and annotations). Implementing this from scratch, even using the excellent API provided by JDT is a challenge. Fortunately, Sapphire's JDT integration makes this quite easy.

The first step is the model.

@Type( base = JavaTypeName.class )
@Reference( target = JavaType.class )
@Label( standard = "filter" )
@JavaTypeConstraint( kind = { JavaTypeKind.CLASS, JavaTypeKind.INTERFACE }, type = "java.io.FileFilter" )
@MustExist
@Required

ValueProperty PROP_FILTER = new ValueProperty( TYPE, "Filter" );

ReferenceValue<JavaTypeName,JavaType> getFilter();
void setFilter( String value );
void setFilter( JavaTypeName value );

Here we utilize reference value construct which states that the property holds a JavaTypeName which is resolvable to a JavaType. The resolution is provided by the framework and works as long as the model is loaded in the context of a Java project.

The @JavaTypeConstraint annotation specifies that the referenced type must be a class or an interface and that it must derive from java.io.FileFilter type.

The @MustExist annotation specifies that the named type must be present in the project.

The @Required annotation specifies that the property must have a value (null is not ok).

The next step is the UI definition. Here we create an editor section with a single property editor, but the property editor is, of course, not limited to editor sections. It can be used in any form context.

<section>
    <content>
        <property-editor>Filter</property-editor>
    </content>
</section>

That is all that is necessary to define a model property that references a Java type and to present that property in the UI. Once this example is executed, you will see a property editor that is composed of a label, a text box, two action buttons and a validation feedback marker.

Capture-1

Clicking on the validation feedback marker shows the problem message along with wealth of semantic information about the property.

Capture-2

The browse button provides the means to select from among existing Java types using JDT's type selection dialog. The framework automatically constraints the contents of the dialog based on @JavaTypeConstraint annotation.

Capture-3

Capture-4

The create button provides the means to define a new Java type if the specified type name cannot be resolved.

Capture-5

Since @JavaTypeConstraint annotation in this example specifies that the property can reference either a class or an interface, the user is presented with a choice after clicking on the create button.

Capture-6

Once the appropriate option is selected, the new type is created and opened in the Java editor. The created type derives from the type specified in @JavaTypeConstraint annotation and is formatted according to user's format preferences.

Capture-7

Note that this article covers features in 0.3.1 and 0.4 releases of Sapphire, which at the time of this writing are still in development. A subset of the described features is available in version 0.3, which is the latest released version. Please direct all questions to the forum.

Friday, March 18, 2011

State of Sapphire for Spring 2011

It has been a busy five months for the Sapphire team since the project was created in October of 2010. The initial code contribution from Oracle has gone through the Eclipse Foundation’s IP review, we have source in CVS, bugs in Bugzilla and builds running on every commit. Even though the current project team is only staffed by Oracle employees, we make it a point to communicate in the open on the adopter forum and the developer mailing list.

Releases

Two feature releases and two service releases shipped so far.

Version 0.1

The initial stable code contribution from Oracle, but refactored for eclipse.org namespace, build and legal requirements.

Version 0.1.1

Some infrastructure work was still ongoing when 0.1 shipped. Version 0.1.1 delivered the binaries in signed form.

Version 0.2

Major enhancements, such as a powerful resource abstraction for models, expression language, transient properties, derived properties, new property editors and many more. Despite shipping concurrently with the 0.1 release, version 0.2 represents roughly six months of new feature work that was happening as we were waiting on the project creation process.

Version 0.2.1

No major release can happen without at least a few bugs getting through.

Adoption

You might ask… This technology does look promising, but how do I really know if it is ready for production?

Sapphire may be young at Eclipse, but it has been in development since at least 2007 as part of BEA’s and later Oracle’s Eclipse tooling efforts. Oracle Enterprise Pack for Eclipse (OEPE) heavily leverages Sapphire to create a variety of form based user interfaces across the product.  During the transition to Eclipse, we worked quickly to close the feedback loop between the new Sapphire project and its big adopter. To that end, OEPE 11.1.1.7 shipped with Sapphire 0.1.1 and upcoming OEPE 11.1.1.7.1 will ship with Sapphire 0.2.1 release. The tight feedback loop from OEPE has enabled us to quickly stabilize the major new features delivered in the 0.2 release.

We are also getting ready to announce a major new endeavor to, in part, promote adoption of Sapphire across Eclipse. In the next few weeks, we will formally propose a project under WTP to use Sapphire to create editors for standard Java EE deployment descriptors.

Little Miss Sapphire

On February 8th, Sapphire family grew by one with the birth of Little Miss Sapphire or Amelia as she is known when she is not voicing opinions on architectural issues.

3D2B2359

I am still mastering the art of typing with one hand. My Das Keyboard doesn’t make this easy, but I like a good challenge.

Release 0.3 and Indigo

The next major Sapphire release is scheduled to go out concurrently with Indigo in June of 2011. We are pushing improvements on two fronts.

First, we are adding support for creating diagram editors, defined and wired to the model in a similar way that forms are today. The current diagram parts renderer uses Graphiti, but the application developer will not interact with Graphiti directly, allowing renderer implementation to be changed or swapped out in the future.

By the time 0.3 ships, you will be able to create slick three-page editors showing source, form and diagram views on the same data. Bi-directional editing is so yesterday. Welcome to tri-directional editing!

diagram

Second, we are making a major push on improving the facilities provided by the SDK to make developing with Sapphire even easier. The big new feature is an editor for Sapphire UI definitions (aka sdef files). All the content assist and validation isn’t finished yet, but the editor is already much better than editing XML markup by hand. The editor is, naturally, built using Sapphire. Yesterday, I spent a good portion of the day using the sdef editor from a previous build to work on new editor features for the next build. Extreme dogfooding!

sdef

Shenxue Zhou Becomes a Committer

Shenxue has been involved with Sapphire as a consumer for a long time, but over the last several months, she has progressed to contributor status with her work on the diagram editing support. After a number of high quality patches, we welcomed Shenxue as the first elected committer on the project.

EclipseCon 2011

I am going to be giving a 20 minute talk on Sapphire at this year’s EclipseCon. No slides to bore you with. Just a live demo of building a project using Sapphire. If you are at all interested in this technology, come see the demo. It should be entertaining (one way or another).

If you cannot make it to the talk, I will be at the conference all four days, so flag me down between sessions or at the bar. Another Sapphire committer, Ling Hao, will also be attending EclipseCon this year.

Thursday, August 26, 2010

Inconvenient process? Let’s fix it.

Some of you may have noticed the debate happening regarding proper entry expectations for WTP incubator project following Holger’s veto of a committer election. Holger is acting well within the power granted to him by Eclipse Development Process (EDP), but is it a right and proper action?

Every committer on a project has the veto power in an election. By extension, any entry criteria for a project (whether written or unwritten) is nothing more than a social convention. The reality is that every committer can choose to levy their own personal expectations. Most of the time it’s not a problem, except when it is.

Here are some quotes from this particular event:

“I found only some bug reports but not a single code contribution from any of the four nominated persons. Please attach the planned code contribution to a bug report. I'd like to vote for each of the nominated persons as soon as I know that the code is readable and covered by JUnit tests.”

“Have [snip] been asked if they like to become committers as individuals (and not only as employees of SAP)? Are these authors of the code or what is their motivation to maintain and enhance these editors?”

In a regular project with established code base, established team and well-defined scope, you can argue that giving every committer veto power over elections is appropriate. After all, there is an established code base to protect. The same considerations do not apply when a new component is proposed in an incubator.

The WTP incubator project was started with the intention to provide a low entry barrier playground for people to come and experiment on new ideas while gaining experience and proving their merit to committers on the core projects that will eventually be asked to admit matured functions. Incubators make sense because they provide a quicker way to get started than a separate project proposal. Unfortunately incubators have to rely on a social convention that existing committers act in a welcoming fashion to newcomers. Most of the time that happens, except when it doesn’t.

I would posit that there is no legitimate purpose served by holding a committer election when a new component is proposed for an incubator. The situation is supposed to be very similar to new project creation and we don’t hold elections there. The party proposing a project gets to designate a group of individuals to be the initial committers without anyone questioning their credentials or motives. A similar process is needed to make incubators work better.

The last revision of EDP has formalized the concept of a persistent incubator. I propose that we build on those revisions and amend EDP to remove the committer vote requirement for incubator projects when a new component is being proposed. The project’s PMC would still have the oversight and ability to decline a new component proposal. This change would also fix the rather awkward problem of having to have “seeder” committers when creating incubator projects.

Note that my suggestion is for persistent incubator projects rather than normal projects during incubation phase. I am also not suggesting that we remove committer vote entirely from incubators. Anyone wishing to join existing effort already underway in the incubator should still be subject to committer vote.

Thoughts?

PS.1 : This situation has served to highlight a process problem and it is the process that I seek to improve. I have no beef with Holger. I am sure he is acting on what he believes in.

PS.2 : I am further confident that this particular storm will blow over, Holger’s objections will be met, another election held, etc. That doesn’t mean we shouldn’t try to improve the process so that such situations do not happen again and we continue to have vibrant incubator projects at Eclipse.

Update: At Wayne’s request I created a bug to track this proposed improvement to Eclipse Development Process.

Thursday, July 8, 2010

Sapphire – Focus on Localization

If you have missed the introduction to Sapphire, make sure to read it first… Introduction to Sapphire

Localization is like build systems, something that most developers prefer not to think about. Unfortunately, the developer must take explicit steps to manually externalize all user-visible strings for the software to be localizable. The localizable strings go into a separate file and the code references them by a key. The developer must come up with a key and then must manage the list of externalized strings so that it stays in sync with the code. Some tools have been developed to make this a little easier, but two types of problems remain very common:

  1. Strings that should be externalized are not. It’s too easy for the developer to put the string directly into code and then forget to externalize it later.
  2. The string resource files get out of sync with code. The case where the resource file is missing a string is easy enough to catch at runtime. The case where resource files contain orphaned strings not referenced in code is much harder to detect.

Since Sapphire is a UI framework, localization is very important. Since Sapphire is focused on ease of use and developer productivity, relying on current methods of localization is not satisfactory.

Localizable strings largely occur in two places in Sapphire. You see them in the model annotations (such as the @Label annotation) and you see them throughout the UI definition files. Sapphire’s approach is to allow the developer to leave the strings in their original language at point of use. The string resource files that will be translated are created at build time. The build system takes the original string and applies a function to it to generate a key for the string resources file. The same function is applied at runtime to derive the key to lookup the translated string.

The critical concept is that the developer does not take any explicit steps to enable localization. It just happens under the covers.

The nature of the function that is used to derive the string resources file key is not particularly important as long as the resulting key is not overly long and is reasonably free from collisions. The current implementation takes the original string, chops it off at 20 characters and replaces some characters that are illegal in a property file key with an underscore. Decent approach for the first cut, but we will likely replace it with an md5 hash in the first version of Sapphire to ship at Eclipse Foundation.

On top of the automatic externalization, Sapphire is architected to minimize the number of strings that must be externalized in the first place. In particular, when the developer specifies a property label, the string is expected to be all in lower case (except where acronyms or proper nouns are used). Sapphire is able to transform the capitalization of the label to make it suitable for different contexts. Three modes of capitalization are supported:

  1. NO_CAPS:  Basically the original string as specified by developer. This is most frequently used for embedding inside validation messages.
  2. FIRST_WORD_ONLY:  This is your typical label in the UI. The colon is added by the UI renderer where appropriate.
  3. TITLE_STYLE:  This is typically used in column headers, section headers, dialog titles, etc.

The current capitalization algorithm works well for English and reasonably well for other languages, but it will need to be made pluggable in the future.

Wednesday, June 30, 2010

Extension system when you cannot depend on OSGi?

I've been developing with OSGi for so long that sometimes I forget that not everyone in the Java world can take advantage of all the benefits offerred by it. Recently I have been contemplating the approaches to framework extensibility when you cannot depend on OSGi. Note that I am not looking for other solutions to modularity. I am looking for an extension contribution system that is not specific to OSGi. We'd like to support Sapphire in all Java UI contexts and extensibility for implementing new UI parts, renderers, etc. is key.

Before I start re-inventing the wheel... Have others faced similar requirements? If so, what was the approach that you chose?

Tuesday, June 29, 2010

Sapphire - Focus on Browsing

If you have missed the introduction to Sapphire, make sure to read it first... Introduction to Sapphire

One of the most enduring UI patterns is a browse button next to the text box for selecting among possible values. Very frequently the scenario is to browse for files or folders, but the pattern is more generic than that and has been used to browse for arbitrary items especially when the set of possible values can be large.

In Sapphire, developers are not creating and wiring up individual UI widgets. This makes it possible to implement the browse button pattern at a higher level of abstraction. If a browse handler is active for a property, a browse button will be automatically created. The framework will even register a keyboard shortcut (Ctrl+L, 'L' is for locate) which can be used to open the browse dialog while focus is on the text field.

Sapphire uses image-based buttons for compactness and to create a more modern look-n-feel. In the following screen capture you can see how the browse buttons appear to the user. Note a tiny browse image in the table cell editor. That's a browse button too.

browse-buttons

File System Paths

Sapphire provides a set of annotations that make it easier to deal with file system paths. The developer uses these annotations to specify the semantics of the property and Sapphire automatically adds validation and browsing support.

Consider the case where a property must hold an absolute path to a file that must exist and must have "jar" or "zip" extension. Such a property could be declared as follows:

@Type( base = IPath.class )
@AbsolutePath
@ValidFileSystemResourceType( FileSystemResourceType.FILE )
@ValidFileExtensions( { "jar", "zip" } )
@MustExist
    
ValueProperty PROP_ABSOLUTE_FILE_PATH = new ValueProperty( TYPE, "AbsoluteFilePath" );
    
Value<IPath> getAbsoluteFilePath();
void setAbsoluteFilePath( String value );
void setAbsoluteFilePath( IPath value );

Based on the above specification, the framework will attach validation that will make sure that the entered path is absolute, that it references a file, that the referenced file exists and that it has the appropriate extension. That happens in the model layer. The UI framework will see these annotations and supply a browse button wired to open the operating system's native file browse dialog pre-filtered to only show jar and zip files.

Similar support is available for absolute folder paths. Just remove @ValidFileExtensions and change @ValidFileSystemResourceType.

Or maybe you are writing an extension to Eclipse IDE and your property needs to hold a workspace path instead of an absolute path... Just replace @AbsolutePath with @EclipseWorkspacePath in the above example. The validation will change to use Eclipse resources API and the native browse dialog will be replaced with the standard Eclipse workspace resources dialog.

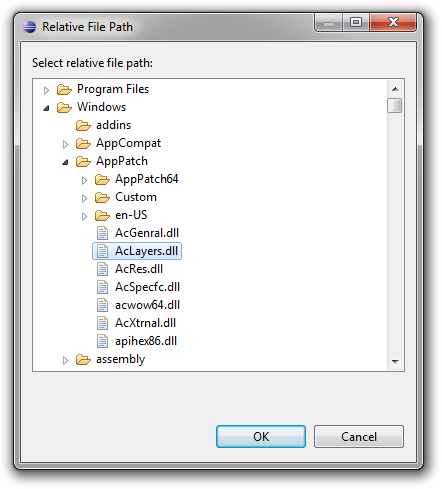
Or maybe you need to deal with relative paths, but you have custom requirements for how these relative paths are to be resolved. Sapphire still got you covered. Just replace @AbsolutePath with @BasePathsProvider annotations and implement a class that returns all possible roots...

@Type( base = IPath.class )
@BasePathsProvider( CustomBasePathsProvider.class )
@ValidFileSystemResourceType( FileSystemResourceType.FILE )
@ValidFileExtensions( "dll" )
@MustExist
    
ValueProperty PROP_RELATIVE_FILE_PATH = new ValueProperty( TYPE, "RelativeFilePath" );
    
Value<IPath> getRelativeFilePath();
void setRelativeFilePath( String value );
void setRelativeFilePath( IPath value );
public final class CustomBasePathsProvider extends BasePathsProviderImpl
{
    @Override
    public List<IPath> getBasePaths( IModelElement element )
    {
        final List<IPath> roots = new ArrayList<IPath>();
        
        roots.add( new Path( "c:/Windows" ) );
        roots.add( new Path( "c:/Program Files" ) );

        return roots;
    }
}

You will still get all the validation that you would get with an absolute path, including validation for existence which will try to locate your path using the roots returned by your base paths provider. On the UI side you will get a custom browse dialog box that lets you browse for resources in all the roots simultaneously. This can be very powerful in many contexts where the system that UI is being built for searches for the specified file in a set of defined locations.

relative-path 

String Values

Another common scenario is the case where the value must come from a list possible values not necessarily tied to something specific like file system resources. For instance, consider the case where a property must reference an entity name from the set of entities defined elsewhere.

Sapphire provides a set of three annotations to simplify these scenarios. The annotations are @PossibleValuesProvider, @PossibleValues and @PossibleValuesFromModel. Of the three annotations, the first one is the most generic one. It lets the developer implement a class that computes the set of possible values at runtime...

@PossibleValuesProvider( impl = CityNameValuesProvider.class )
    
ValueProperty PROP_CITY = new ValueProperty( TYPE, "City" );
    
Value<String> getCity();
void setCity( String value );
public class CityNameValuesProvider extends PossibleValuesProviderImpl
{
    @Override
    protected abstract void fillPossibleValues( SortedSet values )
    {
        // Your logic goes here.
    }
}

If you find that in your scenario the set of possible values is static you can use the @PossibleValues annotation instead. This annotation lets you specify the set of possible values right in the annotation instead of implementing a custom values provider.

Or maybe your scenario calls for a property to draw its possible values from another property in the model. The @PossibleValuesFromModel annotation has you covered. It lets you specify a path through the model where possible values should be harvested.

@PossibleValuesFromModel( path = "/Contacts/Name", caseSensitive = false ) 
    
ValueProperty PROP_ASSISTANT = new ValueProperty( TYPE, "Assistant" );
    
Value<String> getAssistant();
void setAssistant( String value );

Regardless of which of the three annotations you use, you will get validation that will check that the specified value is in the set of possible values. Additional attributes are available on all three of these annotations that let you customize the validation. For instance, you can change the problem severity to warning or even disable validation completely. You can even specify whether the comparison should be case sensitive. On the UI front, you will get browse button wired to the standard list item selection dialog.

possible-values 

Java Types

Sapphire even integrates with JDT to support properties that reference classes or interfaces visible to a given Java project. The developer uses the supplied JavaTypeName class as the type for a value property and then tunes the semantics using @JavaTypeConstraints and @MustExist annotations. Sapphire takes care of the rest. You get validation for type existence, kind of type (interface, class, etc.) and even whether type derives from another type. On the UI side, you get a browse button wired to JDT's type selection dialog.

In the following example, the property is specified to take a name of a non-abstract class that must extend AbstractList class while also implementing Cloneable interface.

@Type( base = JavaTypeName.class )
@JavaTypeConstraints( kind = JavaTypeKind.CLASS, type = { "java.util.AbstractList", "java.lang.Cloneable" } )
@MustExist
    
ValueProperty PROP_CUSTOM_LIST_CLASS = new ValueProperty( TYPE, "CustomListClass" );
    
Value<JavaTypeName> getCustomListClass();
void setCustomListClass( String value );
void setCustomListClass( JavaTypeName value );

java-type 

Completely Custom

Sapphire browse handling support is extensible to support cases that do not fit one of the above molds. To do this, you create a custom class that extends BrowseHandler. You can then register your browse handler globally (to activate under a condition that you specify) or locally for a specific property editor in the UI definition. The second case is more common.

Here is an example:

<property-editor>
  <property>Photo</property>
  <browse-handler>
    <class>PhotosCatalogBrowseHandler</class>
  </browse-handler>
</property-handler>

Multi-Way

One variant of the browse button pattern has baffled UI writers for years. In some cases, the semantics of the property require the use of more than one browse dialog. For instance, consider the case where the property can take an absolute path to an archive file or a folder. No established convention exists for how to handle this case and developers have tried a number of different options. Here are a few examples from Eclipse itself.

multi-way-1 

multi-way-2 

multi-way-3

Sapphire adopts the convention of using a drop-down menu from the browse button when multiple browse handlers are active concurrently. Here is what that looks like:

multi-way-sapphire

Currently, there are no model annotations that can fully describe the complex semantics of such scenarios. The developer must register the browse handlers in the UI definition. Validation should be done in a custom validator class attached via @Validator annotation.

Here is the UI definition from the above screen capture. All the system-provided browse handlers that activate when certain annotations are used are also available for direct reference from the UI definitions as can be seen in this example.

<property-editor>
  <property>MultiOptionPath</property>
  <browse-handler>
    <class>AbsoluteFilePathValueBrowseHandler</class>
    <param>
      <name>extensions</name>
      <value>jar,zip</value>
    </param>
  </browse-handler>
  <browse-handler>
    <class>AbsoluteFolderPathValueBrowseHandler</class>
  </browse-handler>
  <browse-handler>
    <class>EclipseWorkspacePathValueBrowseHandler</class>
    <param>
      <name>extensions</name>
      <value>jar,zip</value>
    </param>
    <param>
      <name>leading-slash</name>
      <value>true</value>
    </param>
  </browse-handler>
</property-editor>

Friday, June 25, 2010

Sapphire

Little has changed in the way Java desktop UI is written since the original Java release. Technologies have changed (AWT, Swing, SWT, etc.), but fundamentals remain the same. The developer must choose which widgets to use, how to lay those widgets out, how to store the data being edited and how to synchronize the model with the UI. Even the best developers fall into traps of having UI components talk directly to other UI components rather than through the model. Inordinate amount of time is spent debugging layout and data-binding issues.

Sapphire aims to raise UI writing to a higher level of abstraction. The core premise is that the basic building block of UI should not be a widget (text box, label, button, etc.), but rather a property editor. Unlike a widget, a property editor analyzes metadata associated with a given property, renders the appropriate widgets to edit that property and wires up data binding. Data is synchronized, validation is passed from the model to the UI, content assistance is made available, etc.

This fundamentally changes the way developers interact with a UI framework. Instead of writing UI by telling the system how to do something, the developer tells the system what they intend to accomplish. When using Sapphire, the developer says "I want to edit LastName property of the person object". When using widget toolkits like SWT, the developer says "create label, create text box, lay them out like so, configure their settings, setup data binding and so on". By the time the developer is done, it is hard to see the original goal in the code that's produced. This results in UI that is inconsistent, brittle and difficult to maintain.

First, The Model

Sapphire includes a simple modeling framework that is tuned to the needs of the Sapphire UI framework and is designed to be easy to learn. It is also optimized for iterative development. A Sapphire model is defined by writing Java interfaces and using annotations to attach metadata. An annotation processor that is part of Sapphire SDK then generates the implementation classes. Sapphire leverages Eclipse Java compiler to provide quick and transparent code generation that runs in the background while you work on the model. The generated classes are treated as build artifacts and are not source controlled. In fact, you will rarely have any reason to look at them. All model authoring and consumption happens through the interfaces.

In this article we will walk through a Sapphire sample called EzBug. The sample is based around a scenario of building a bug reporting system. Let's start by looking at IBugReport.

@GenerateXmlBinding

public interface IBugReport extends IModelElementForXml, IRemovable
{
    ModelElementType TYPE = new ModelElementType( IBugReport.class );
    
    // *** CustomerId ***
    
    @XmlBinding( path = "customer" )
    @Label( standard = "customer ID" )

    ValueProperty PROP_CUSTOMER_ID = new ValueProperty( TYPE, "CustomerId" );

    Value<String> getCustomerId();
    void setCustomerId( String value );

    // *** Title ***
    
    @XmlBinding( path = "title" )
    @Label( standard = "title" )
    @NonNullValue

    ValueProperty PROP_TITLE = new ValueProperty( TYPE, "Title" );

    Value<String> getTitle();
    void setTitle( String value );
    
    // *** Details ***
    
    @XmlBinding( path = "details" )
    @Label( standard = "details" )
    @LongString
    @NonNullValue

    ValueProperty PROP_DETAILS = new ValueProperty( TYPE, "Details" );

    Value<String> getDetails();
    void setDetails( String value );
    
    // *** ProductVersion ***

    @Type( base = ProductVersion.class )
    @XmlBinding( path = "version" )
    @Label( standard = "version" )
    @DefaultValue( "2.5" )

    ValueProperty PROP_PRODUCT_VERSION = new ValueProperty( TYPE, "ProductVersion" );

    Value<ProductVersion> getProductVersion();
    void setProductVersion( String value );
    void setProductVersion( ProductVersion value );
    
    // *** ProductStage ***

    @Type( base = ProductStage.class )
    @XmlBinding( path = "stage" )
    @Label( standard = "stage" )
    @DefaultValue( "final" )

    ValueProperty PROP_PRODUCT_STAGE = new ValueProperty( TYPE, "ProductStage" );

    Value<ProductStage> getProductStage();
    void setProductStage( String value );
    void setProductStage( ProductStage value );
    
    // *** Hardware ***

    @Type( base = IHardwareItem.class )
    @ListPropertyXmlBinding( mappings = { @ListPropertyXmlBindingMapping( element = "hardware-item", type = IHardwareItem.class ) } )
    @Label( standard = "hardware" )
    
    ListProperty PROP_HARDWARE = new ListProperty( TYPE, "Hardware" );
    
    ModelElementList<IHardwareItem> getHardware();
}

As you can see in the above code listing, a model element definition in Sapphire is composed of a series of blocks. These blocks define properties of the model element. Each property block has a PROP_* field that declares the property, the metadata in the form of annotations and the accessor methods. All metadata about the model element is stored in the interface. There are no external files. When this interface is compiled, Java persists these annotation in the .class file and Sapphire is able to read them at runtime.

Sapphire has three types of properties: value, element and list. Value properties hold simple data, such as strings, integers, enums, etc. Any object that is immutable and can be serialized to a string can be stored in a value property. An element property holds a reference to another model element. You can specify whether this nested model element should always exist or if it should be possible to create and delete it. A list property holds zero or more model elements. A list can be homogeneous (only holds one type of elements) or heterogeneous (holds elements of various specified types).

Using a combination of list and element properties, it is possible to create an arbitrary model hierarchy. In the above listing, there is one list property. It is homogeneous and references IHardwareItem element type. Let's look at that type next.

@GenerateXmlBinding

public interface IHardwareItem extends IModelElementForXml, IRemovable
{
    ModelElementType TYPE = new ModelElementType( IHardwareItem.class );
    
    // *** Type ***
    
    @Type( base = HardwareType.class )
    @XmlBinding( path = "type" )
    @Label( standard = "type" )
    @NonNullValue

    ValueProperty PROP_TYPE = new ValueProperty( TYPE, "Type" );

    Value<HardwareType> getType();
    void setType( String value );
    void setType( HardwareType value );
    
    // *** Make ***
    
    @XmlBinding( path = "make" )
    @Label( standard = "make" )
    @NonNullValue

    ValueProperty PROP_MAKE = new ValueProperty( TYPE, "Make" );

    Value<String> getMake();
    void setMake( String value );
    
    // *** ItemModel ***
    
    @XmlBinding( path = "model" )
    @Label( standard = "model" )

    ValueProperty PROP_ITEM_MODEL = new ValueProperty( TYPE, "ItemModel" );

    Value<String> getItemModel();
    void setItemModel( String value );

    // *** Description ***
    
    @XmlBinding( path = "description" )
    @Label( standard = "description" )
    @LongString

    ValueProperty PROP_DESCRIPTION = new ValueProperty( TYPE, "Description" );

    Value<String> getDescription();
    void setDescription( String value );
}

The IHardwareItem listing should look very similar to IBugReport and that's the point. A Sapphire model is just a collection of Java interfaces that are annotated in a certain way and reference each other.

A bug report is contained in IFileBugReportOp, which serves as the top level type in the model.

@GenerateXmlBindingModelImpl
@RootXmlBinding( elementName = "report" )

public interface IFileBugReportOp extends IModelForXml, IExecutableModelElement
{
    ModelElementType TYPE = new ModelElementType( IFileBugReportOp.class );
    
    // *** BugReport ***
    
    @Type( base = IBugReport.class )
    @Label( standard = "bug report" )
    @XmlBinding( path = "bug" )
    
    ElementProperty PROP_BUG_REPORT = new ElementProperty( TYPE, "BugReport" );
    
    IBugReport getBugReport();
    IBugReport getBugReport( boolean createIfNecessary );
}

Let's now look at the last bit of code that goes with this model, which is the enums.

@Label( standard = "type", full = "hardware type" )

public enum HardwareType
{
    @Label( standard = "CPU" )

    CPU,
    
    @Label( standard = "main board" )
    @EnumSerialization( primary = "Main Board" )
    
    MAIN_BOARD,

    @Label( standard = "RAM" )
    
    RAM,
    
    @Label( standard = "video controller" )
    @EnumSerialization( primary = "Video Controller" )
    
    VIDEO_CONTROLLER,

    @Label( standard = "storage" )
    @EnumSerialization( primary = "Storage" )
    
    STORAGE,
    
    @Label( standard = "other" )
    @EnumSerialization( primary = "Other" )
    
    OTHER
}


@Label( standard = "product stage" )

public enum ProductStage
{
    @Label( standard = "alpha" )
    
    ALPHA,

    @Label( standard = "beta" )
    
    BETA,

    @Label( standard = "final" )
    
    FINAL
}


@Label( standard = "product version" )

public enum ProductVersion
{
    @Label( standard = "1.0" )
    @EnumSerialization( primary = "1.0" )
    
    V_1_0,
    
    @Label( standard = "1.5" )
    @EnumSerialization( primary = "1.5" )

    V_1_5,
    
    @Label( standard = "1.6" )
    @EnumSerialization( primary = "1.6" )
    
    V_1_6,
    
    @Label( standard = "2.0" )
    @EnumSerialization( primary = "2.0" )
    
    V_2_0,
    
    @Label( standard = "2.3" )
    @EnumSerialization( primary = "2.3" )
    
    V_2_3,
    
    @Label( standard = "2.4" )
    @EnumSerialization( primary = "2.4" )
    
    V_2_4,
    
    @Label( standard = "2.5" )
    @EnumSerialization( primary = "2.5" )
    
    V_2_5
}

You can use any enum as a type for a Sapphire value property. Here, once again, you see Sapphire pattern of using Java annotations to attach metadata to model particles. In this case the annotations are specifying how Sapphire should present enum items to the user and how these items should be serialized to string form.

Then, The UI

The bulk of the work in writing UI using Sapphire is modeling the data that you want to present to the user. Once the model is done, defining the UI is simply a matter of arranging the properties on the screen. This is done via an XML file.

<definition>

  <import>
    <bundle>org.eclipse.sapphire.samples</bundle>
    <package>org.eclipse.sapphire.samples.ezbug</package>
  </import>
  
  <composite>
    <id>bug.report</id>
    <content>
      <property-editor>CustomerId</property-editor>
      <property-editor>Title</property-editor>
      <property-editor>
        <property>Details</property>
        <hint>
          <name>expand.vertically</name>
          <value>true</value>
        </hint>
      </property-editor>
      <property-editor>ProductVersion</property-editor>
      <property-editor>ProductStage</property-editor>
      <property-editor>
        <property>Hardware</property>
        <child-property>
          <name>Type</name>
        </child-property>
        <child-property>
          <name>Make</name>
        </child-property>
        <child-property>
          <name>ItemModel</name>
        </child-property>
      </property-editor>
      <composite>
        <indent>true</indent>
        <content>
          <separator>
            <label>Details</label>
          </separator>
          <switching-panel>
            <list-selection-controller>
              <property>Hardware</property>
            </list-selection-controller>
            <panel>
              <key>IHardwareItem</key>
              <content>
                <property-editor>
                  <property>Description</property>
                  <hint>
                    <name>show.label.above</name>
                    <value>true</value>
                  </hint>
                  <hint>
                    <name>height</name>
                    <value>5</value>
                  </hint>
                </property-editor>
              </content>
            </panel>
            <default-panel>
              <content>
                <label>Select a hardware item above to view or edit additional parameters.</label>
              </content>
            </default-panel>
          </switching-panel>
        </content>
      </composite>
    </content>
    <hint>
      <name>expand.vertically</name>
      <value>true</value>
    </hint>
    <hint>
      <name>width</name>
      <value>600</value>
    </hint>
    <hint>
      <name>height</name>
      <value>500</value>
    </hint>
  </composite>

  <dialog>
    <id>bug.report.dialog</id>
    <label>Create Bug Report (Sapphire Sample)</label>
    <initial-focus>Title</initial-focus>
    <content>
      <composite-ref>
        <id>bug.report</id>
      </composite-ref>
    </content>
    <hint>
      <name>expand.vertically</name>
      <value>true</value>
    </hint>
  </dialog>
  
</definition>

A Sapphire UI definition is a hierarchy of parts. At the lowest level we have the property editor and a few other basic parts like separators. These are aggregated together into various kinds of composities until the entire part hierarchy is defined. Some hinting here and there to guide the UI renderer and the UI definition is complete. Note the top-level composite and dialog elements. These are parts that you can re-use to build more complex UI definitions or reference externally from Java code.

Next we will write a little bit of Java code to open the dialog that we defined.

final IFileBugReportOp op = new FileBugReportOp( new ModelStoreForXml( new ByteArrayModelStore() ) );
final IBugReport report = op.getBugReport( true );

final SapphireDialog dialog 
    = new SapphireDialog( shell, report, "org.eclipse.sapphire.samples/sdef/EzBug.sdef!bug.report.dialog" );
        
if( dialog.open() == Dialog.OK )
{
    // Do something. User input is found in the bug report model.
}

Pretty simple, right? We create the model and then use the provided SapphireDialog class to instantiate the UI by referencing the model instance and the UI definition. The pseudo-URI that's used to reference the UI definition is simply bundle id, followed by the path within that bundle to the file holding the UI definition, followed by the id of the definition to use.

Let's run it and see what we get...
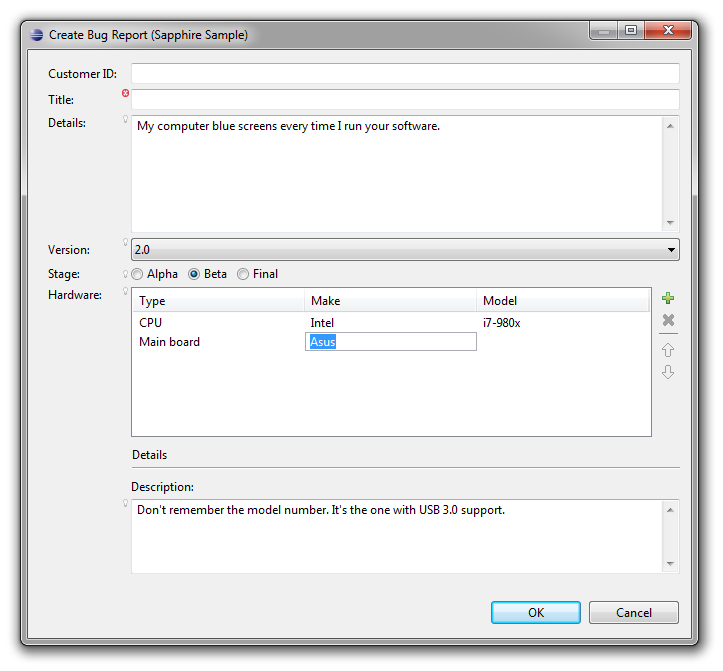
dialog

There you have it. Professional rich UI backed by your model with none of the fuss of configuring widgets, trying to get layouts to do what you need them to do or debugging data binding issues.

One Step Further

A dialog is nice, but really a wizard would be better suited for filing a bug report. Can Sapphire do that? Sure. Let's first go back to the model. A wizard is a UI pattern for configuring and then executing an operation. Our model is not really an operation yet. We can create and populate a bug report, but then we don't know what to do with it.

Any Sapphire model element can be turned into an operation by adding an execute method. We will do that now with IFileBugReportOp. In particular, IFileBugReportOp will be changed to also extend IExecutableModelElement and will acquire the following method definition:

// *** Method: execute ***
    
@DelegateImplementation( FileBugReportOpMethods.class )
    
IStatus execute( IProgressMonitor monitor );

Note how the execute method is specified. We don't want to modify the generated code to implement it, so we use delegation instead. The @DelegateImplementation annotation can be used to delegate any method on a model element to an implementation located in another class. The Sapphire annotation processor will do the necessary hookup.

public class FileBugReportOpMethods
{
    public static final IStatus execute( IFileBugReportOp context, IProgressMonitor monitor )
    {
        // Do something here.
        
        return Status.OK_STATUS;
    }
}

The delegate method implementation must match the method being delegated with two changes: (a) it must be static, and (b) it must take the model element as the first parameter.

Now that we have completed the bug reporting operation, we can return to the UI definition file and add the following:

<wizard>
  <id>wizard</id>
  <label>Create Bug Report (Sapphire Sample)</label>
  <page>
    <id>main.page</id>
    <label>Create Bug Report</label>
    <description>Create and submit a bug report.</description>
    <initial-focus>Title</initial-focus>
    <content>
      <with>
        <property>BugReport</property>
        <content>
          <composite-ref>
            <id>bug.report</id>
          </composite-ref>
        </content>
      </with>
    </content>
    <hint>
      <name>expand.vertically</name>
      <value>true</value>
    </hint>
  </page>
</wizard>

The above defines a one page wizard by re-using the composite definition created earlier. Now back to Java to use the wizard...

final IFileBugReportOp op = new FileBugReportOp( new ModelStoreForXml( new ByteArrayModelStore() ) );
op.getBugReport( true );  // Force creation of the bug report.

final SapphireWizard<IFileBugReportOp> wizard 
    = new SapphireWizard<IFileBugReportOp>( op, "org.eclipse.sapphire.samples/sdef/EzBug.sdef!wizard" );
        
final WizardDialog dialog = new WizardDialog( shell, wizard );
        
dialog.open();

SapphireWizard will invoke the operation's execute method when the wizard is finished. That means we don't have to act based on the result of the open call. The execute method will have completed by the time the open method returns to the caller.

The above code pattern works well if you are launching the wizard from a custom action, but if you need to contribute a wizard to an extension point, you can extend SapphireWizard to give your wizard a zero-argument constructor that creates the operation and references the correct UI definition.

Let's run it...

wizard

One More Step

Now that we have a system for submitting bug reports, it would be nice to have a way to maintain a collection of these reports. Even better if we can re-use some of our existing code to do this. Back to the model.

The first step is to create IBugDatabase type which will hold a collection of bug reports. By now you should have a pretty good idea of what that will look like.

@GenerateXmlBindingModelImpl
@RootXmlBinding( elementName = "bug-database" )

public interface IBugDatabase extends IModelForXml
{
    ModelElementType TYPE = new ModelElementType( IBugDatabase.class );

    // *** BugReports ***
    
    @Type( base = IBugReport.class )
    @Label( standard = "bug report" )
    @ListPropertyXmlBinding( mappings = { @ListPropertyXmlBindingMapping( element = "bug", type = IBugReport.class ) } )
    
    ListProperty PROP_BUG_REPORTS = new ListProperty( TYPE, "BugReports" );
    
    ModelElementList<IBugReport> getBugReports();
}

That was easy. Now let's go back to the UI definition file.

Sapphire simplifies creation of multi-page editors. It also has very good integration with WTP XML editor that makes it easy to create the very typical two-page editor with a form-based page and a linked source page showing the underlying XML. The linkage is fully bi-directional.

To create an editor, we start by defining the structure of the pages that will be rendered by Sapphire. Sapphire currently only supports one editor page layout, but it is a very flexible layout that works for a lot scenarios. You get a tree outline of content on the left and a series of sections on the right that change depending on the selection in the outline.

<editor-page>
  <id>editor.page</id>
  <page-header-text>Bug Database (Sapphire Sample)</page-header-text>
  <initial-selection>Bug Reports</initial-selection>
  <root-node>
    <node>
      <label>Bug Reports</label>
      <section>
        <description>Use this editor to manage your bug database.</description>
        <content>
          <action-link>
            <action-id>node:add</action-id>
            <label>Add a bug report</label>
          </action-link>
        </content>
      </section>
      <node-list>
        <property>BugReports</property>
        <node-template>
          <dynamic-label>
            <property>Title</property>
            <null-value-label>&lt;bug&gt;</null-value-label>
          </dynamic-label>
          <section>
            <label>Bug Report</label>
            <content>
              <composite-ref>
                <id>bug.report</id>
              </composite-ref>
            </content>
          </section>
        </node-template>
      </node-list>
    </node>
  </root-node>
</editor-page>

You can see that the definition centers around the outline. The definition traverses the model as the outline is defined with sections attached to various nodes acquiring the context model element from their node. The outline can nest arbitrarily deep and you can even define recursive structures by externalizing node definitions, assigning ids to them and then referencing those definitions similarly to how this sample references an existing composite definition.

The next step is to create the actual editor. Sapphire includes several editor classes for you to choose from. In this article we will use the editor class that's specialized for the case where you are editing an XML file and you want to have an editor page rendered by Sapphire along with an XML source page.

public final class BugDatabaseEditor extends SapphireEditorForXml
{
    public BugDatabaseEditor()
    {
        super( "org.eclipse.sapphire.samples" );
        setEditorDefinitionPath( "org.eclipse.sapphire.samples/sdef/EzBug.sdef/editor.page" );
    }

    @Override
    protected IModel createModel( final ModelStore modelStore )
    {
        return new BugDatabase( (ModelStoreForXml) modelStore );
    }
}

Finally, we need to register the editor. There are a variety of options for how to do this, but covering all of these options is outside the scope of this article. For simplicity we will register the editor as the default choice for files named "bugs.xml".

<extension point="org.eclipse.ui.editors">
  <editor
    class="org.eclipse.sapphire.samples.ezbug.ui.BugDatabaseEditor"
    default="true"
    filenames="bugs.xml"
    id="org.eclipse.sapphire.samples.ezbug.ui.BugDatabaseEditor"
    name="Bug Database Editor (Sapphire Sample)"/>
</extension>

That's it. We are done creating the editor. After launching Eclipse and creating a bug.xml file, you should see an editor that looks like this:

 editor-small

Sapphire really shines in complex cases like this where form UI is sitting on top a source file that users might edit by hand. In the above screen capture, what happened is that the user manually entered "BETA2" for the product stage in the source view. There is a problem marker next to the property editor and the yellow assistance popup is accessible by clicking on that marker. The problem message is displayed along with additional information about the property and available actions. The "Show in source" action, for instance, will immediately jump to the editor's source page and highlight the text region associated with this property. This is very valuable when you must deal with large files. These facilities and many others are available out of the box with Sapphire with no extra effort from the developer.

Conclusion

Now that you've been introduced to what Sapphire can do, compare it to how you are currently writing UI code. All of the code presented in this article can be written by a developer with just a few weeks of Sapphire experience in an hour or two. How long would it take you to create something comparable using your current method of choice?

I hope that this article has piqued your interest in Sapphire. Oracle is committed to bringing this technology to the open source community. We have proposed a project at the Eclipse Foundation. If you are interested, you should post a message on the project's forum. Introduce yourself and describe your interest. We are actively seeking both consumers of this technologies as well as potential partners to come join the effort and help us take this technology in the directions that we have not yet anticipated.

Sunday, February 1, 2009

Better way to manage dependency version ranges

OSGi provides an extremely powerful and precise mechanism for controlling acceptable version ranges when specifying dependency on bundles or packages. In theory (as described by policies of various projects at Eclipse), the developer would take into account his plugin’s API and behavior needs, cross-reference that with version information about the bundle in question and carefully craft the version range in dependency declaration to accurately reflect his plugin’s actual needs while leaving the version range as open as possible to allow users maximum flexibility when composing an installation. Further, in theory, the developer should be continuously aware of dependency version ranges specified in his product’s various plugins and how they correlate to functionality exposed by those plugin. As development progresses, the developer is supposed to be able to spot when he started depending on functionality that’s not available in the specified min version and reset the min version accordingly.

That’s the theory. In practice I haven’t met a single developer with sufficient time on their hands or sufficient mental capacity to keep all of the necessary information in his head at all times in order to properly apply this policy. What I’ve seen happen most often is that the min range gets set based on whatever the plugin version happens to be at the time the dependency is first added. PDE helpfully inserts this information in your manifest by default. The max version then gets set by applying a team policy (typically by bumping up either the major or the minor version). This happens when dependency is first introduced. As the code continues to evolve, the min version is typically not touched again. The max version is incremented when the build gets broken by the dependency bumping up their versions past a certain point. The cycle repeats.

After many years of observing this situation, I am convinced that having developers manage version ranges creates a lot of overhead and does not yield satisfactory results no matter how hard people try.  To me, dependency version ranges are most useful when you have shipped your product in binary form. When taken collectively across a component (collection of bundles), they represent a statement of what your team is willing to support as a working configuration. Ideally, this information should be consistent across plugins and as accurate as possible.

Any time you talk about setting version ranges, you are considering three versions:

  1. The version that you developed and did most of your testing with. I call this the “target version”. Typically, this is what you would list as recommended configuration in your documentation.
  2. The minimum version that you are willing to support. The level of testing you can afford to allocate to this version is bound to be less than what you would allocate for the target version, so there is a certain amount of risk that an undetected issue is going to slip through. The further back you go from the target version when setting the minimum version, the greater your risk.
  3. The maximum version that you are willing to support. Since this version will typically not exists at the time of your ship date, setting this version involves an educated guess based on understanding of what policies your dependencies use when incrementing their versions and the degree to which you are relying on undocumented (internal) code and behaviors. The spread between the target version and the maximum version is where you highest risk lies. On one hand you’d like to assure long viability of your release in the field. On the other hand, the further out you go, the greater the risk that your product will not work and make a liar out of you in the eyes of your users.

Because getting the above version decisions right and consistent across a component is extremely important, it is not a good idea for individual developers to be making these decisions on a plugin-by-plugin basis. In an Open Source environment, this should be a component-wide decision made collectively by the committers. In a commercial environment, this decision is often made higher up in the organization based on availability of resources and target user base considerations.

When the overall decision is made, it is typically expressed in broad terms. For instance… “this version will ship on Ganymede SR1, but should work with all versions of Ganymede starting with GA”. It is then up to developers to translate that requirement into version ranges in the manifest.

That’s a ton of tedious manual work with lots of room for mistakes. In other words, a perfect candidate for automation. A few years ago, I wrote a set of two custom Ant tasks to automate this process. The first task reads an Eclipse installation and produces an inventory file that lists id and version of every bundle found. The second tasks takes as input an inventory file representing the minimum platform, an inventory file representing the target platform and a policy for setting the maximum versions.  For every dependency, the task looks up the version from the minimum platform inventory. That becomes the left-hand-side of the version range. It then looks up the bundle version in the target platform inventory and applies the policy function to it. Here are some examples of policy functions: “x.y.z ->x+1.0.0”, “x.y.z ->x.y+1.o” or the extremely conservative “x.y.z ->x.y.z+1”. You can set different policies for different plugins or components based on what you know of their versioning conventions. The version returned by the policy function becomes the right-hand-side of the version range.

We have been using these two tasks to automate and improve the quality of our version ranges for several releases of Eclipse tooling products at BEA and now at Oracle. Developers don’t set the versions on the dependencies specified in the bundle manifests stored in the source repository. At the end of every build, a process runs that splices version ranges into the manifests just prior to packaging the bundles for distribution. The target inventory is always generated on the fly based on whatever the product is building against. The minimum platform inventory is generated once when the minimum platform decision is made. The inventory is then stored in the source repository.

This has been an extremely useful process improvement for us. Not only do we have more confidence in the version ranges encoded in our product distributions, but it takes significantly less work for developers to manage all of this. The developers never have to think about dependency versions during normal course of development and integrating new versions of dependencies takes less work (since version ranges in manifest don’t have to be fixed manually to get the build to work).